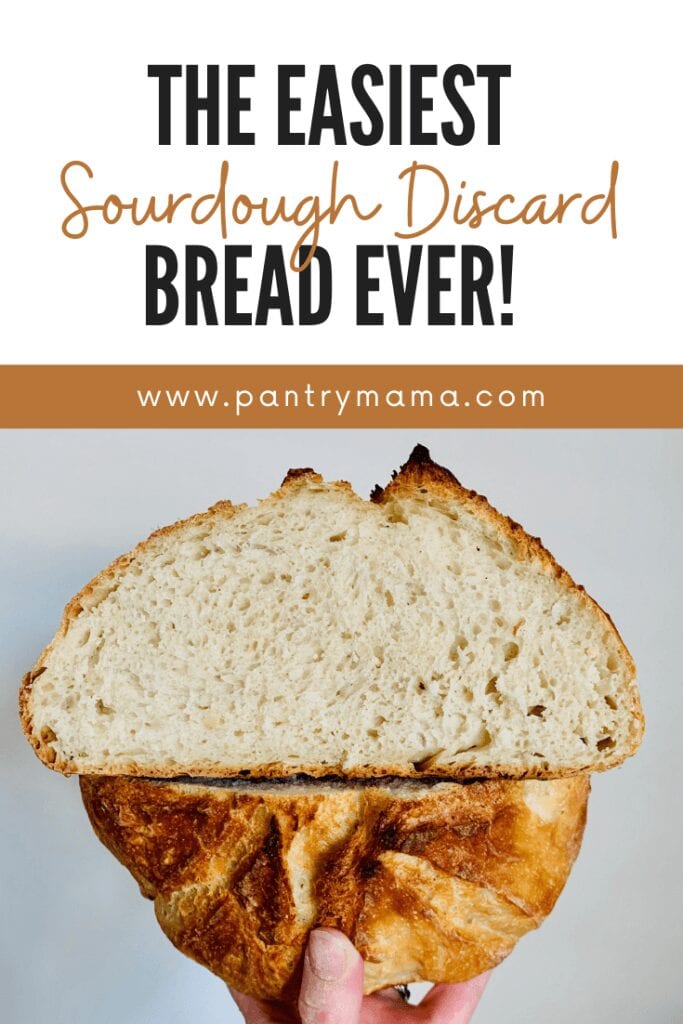
The Easiest Sourdough Discard Bread You'll Ever Make!
This post may contain affiliate links.

If you have a sourdough starter, then chances are you'll have a bit of sourdough discard from time to time - depending on how often you feed it.
Baking true sourdough bread is certainly rewarding, but with our busy lives, we don't always have time for a 2 to 3 day process, right?
So I've created the easiest sourdough discard bread you'll ever make - seriously it's so so simple!
This recipe is perfect if you're still building your sourdough starter, but you really want to bake bread.
Make This Sourdough Discard Bread In Under 2 Hours!
You can make this easy sourdough discard bread within 2 hours if your house is particularly warm. It does use a little commercial yeast - but you will still get some of the sourdough tang from your discard.
If your house is a little cooler, it will take a little longer for the dough to double. Mixing the ingredients takes just seconds!
Experiment With Different Flours
I often make this bread in the evening so I can have a loaf ready for our eggs in the morning. I can knock it out super fast and my kids love to eat it. It's also a great way to experiment with different flours.
While it's super fast to make it from baker's (bread or high protein) flour (AP and plain flour will also work), you could supplement some of the 450g of flour with rye, spelt or even whole wheat.
If you are using different flours, I recommend holding a little of the water back while mixing. It's much easier to add more if you need to, than take it away (or have to add more flour if the mix is too wet).
An Easy Way To Use An Immature Sourdough Starter
This easy sourdough discard bread will also work for you if your starter is not quite ready to start baking true sourdough bread. The commercial yeast will create the rise that is lacking in your sourdough starter.
If you're having trouble with your sourdough starter, you'll find some tips to boost your starter here. You can also join our Facebook Group for sourdough bakers.
You'll find more ideas to use your sourdough discard here as well as a sourdough discard sandwich loaf recipe here.

Extend The Rise
If you don't want to bake your bread immediately once it's risen, you can pop it in the refrigerator for up to 24 hours. Just put the whole bowl in the fridge, covered with a plastic bag or some cling wrap to stop it drying out.
This is a great idea if you want to have it freshly baked for dinner for example or when you first wake up.
When you want to bake it, let it sit out on the kitchen counter for around 30 minutes before it goes in the oven (so take it out when you turn on the oven to preheat).
Want To Give Your Sourdough Discard Loaf A Flavor Boost?
You can add lots of different flavor combinations to this sourdough discard loaf. It's up to you whether you go sweet or savory. Some of my favorite ways to add flavors to this loaf include:
- Jalepeno Cheddar
- Bacon & Cheese
- Olives (you can use whatever olives you love)
- Chocolate chips and orange zest
- Cranberries and walnuts
- Raisins and cinnamon for a fruit loaf
It's best to add the flavors to the dough when you first mix it, that way you can leave it alone to rise rather than have to disturb it to add in the flavors.
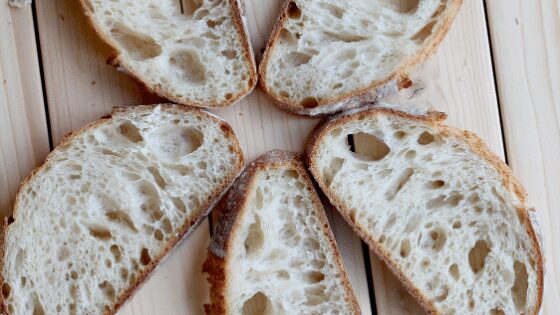
Handling The Dough
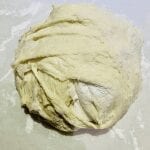
This sourdough discard loaf can be quite a sticky dough. The stickiness will really depend on the consistency of your starter and how wet you choose to make it. But it's certainly not impossible to work with and is one of the most baked recipes in my Facebook Group!
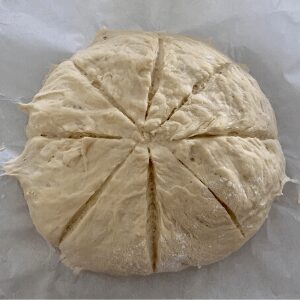
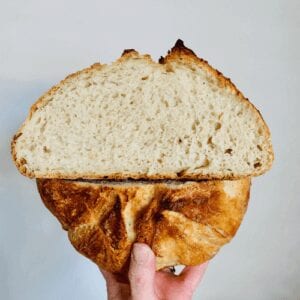
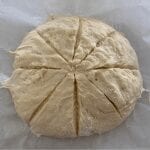
With a little flour and a dough scraper, you should be able to shape it into a roundish shape. It doesn't need to be perfect, it's a rustic type of bread. If you have a bread lame or razor blade, you can score the top to encourage it to spring up in the oven.
If you're looking for a sandwich loaf recipe, you might like this sourdough discard sandwich loaf.
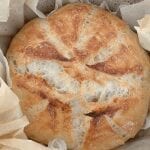
Bake Your Discard Bread In A Dutch Oven
To get the best results for your sourdough discard bread, bake it in a Dutch Oven. It keeps the steam inside the pot and enables your bread to get the rise before the crust starts to harden. Keep the lid on your Dutch Oven for the first 30 minutes of your bake, then take it off for the last 10 minutes to give it some crunch and colour. Just like baking true sourdough, the Dutch Oven really is a game changer.

If you love this recipe, you'll enjoy making this sourdough pane di casa bread. It is a lovely rustic sourdough you can enjoy in just a few hours.
Easy Sourdough Discard Bread
Equipment
- Mixing Bowl
- Digital Scales
- Dutch Oven
Ingredients
- 450 g Bread Flour
- 360 g Water Warm
- 10 g Salt
- 7 g Instant Yeast or Rapid Yeast
- 100 g Sourdough Discard unfed sourdough starter
Instructions
- Take a clean ceramic or glass bowl and add your flour, warm water, instant yeast, salt and sourdough discard.
- Use a wooden chopstick or end of a wooden spoon to gently bring all the ingredients together into a shaggy dough. You don't need to it be fully smooth, just ensure that all of the flour is wet.
- Cover the bowl in cling film and set it somewhere warm for 1 - 2 hours. It really depends on the temperature of your house with this one. If your house is warm, 1 hour will be plenty. In the depths of winter or with air con, you may need more than 2 hours. You just want it to double in size, no more or it won't rise in the oven.
- Around 45 minutes before you want to put your bread into the oven, you'll need to put a dutch oven into the oven and preheat it to around 220C/430F.
- Once your dough has doubled in size, grab a piece of parchment paper and lay it out on your counter. Sprinkle on a few tablespoons of rice flour or fine semolina flour (this is just so that the dough doesn't stick to your hands).NOTE - If you are wanting to put your bread in the refrigerator to bake another time (usually within 24 hours) then just pop the cling film over the bowl of doubled dough and put in the fridge. You don't need to do anything to the dough before it goes in.
- Scoop your dough out with your hands - if it's particularly wet it's perfectly fine to pour it onto the paper.If it's not too wet, use the flour and your finger tips to gently bring it into a round shape - you will need to pull each side over each other to do this. If your dough is too wet - don't fret, just try and bring it into some kind of shape without getting too messy.
- Score your dough if you're able to - otherwise just leave it and it will open up naturally in the oven.
- Carefully take your dutch oven out of the oven and remove the lid. Use the parchment or baking paper as a handle to gently place your discard bread inside the pot and put the lid back on.
- Bake in the oven, with the lid on for 30 minutes at 220C/430F. Then remove the lid of the pot and bake for a further 10 minutes at 200C/390F. Remove the bread from the oven and allow to cool on a wire rack.
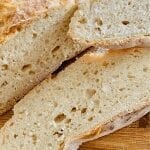
- Try to let it cool for at least an hour before cutting it. It will still taste great if you cut it hot, but it's so much easier to cut if you let it cool!
Nutrition


I'm new at your website and excited to try your recipes. But is there a way that you can give the U.S measurements to cups instead of grams? I've tried looking for conversions online but they seem to be different, so I don't really know which one is accurate.
I only bake using grams because it's accurate. You can read more about why you should always weigh your ingredients here. It's much better to get a scale, rather than try to convert the measurements 🙂
Can I use active dry yeast in place of instant?
Yes you can use active dry yeast instead of instant.
This is such a good recipe. I can’t even count how many times I’ve made it. Here’s how I usually do it:
Make the night before I want it, let it rise until I’m ready to go to bed then pop in the fridge. In the morning I put it on floured parchment paper, pull in the sides to shape, then flip it and score it. Then put it all inside a hot Dutch oven and spray some water on the top of the bread, cover it and bake according to the recipe. SO good!
Love this recipe! It has all the flavor of my artisan overnight bread but in a couple of hours!! Genius!
One question: do you think I could cut down the amount of yeast added? I use rapid rise, and it really RISES! I don’t know that much about bread, so I thought I’d check in. Thank you.
When you use a discard does it have to be at room temperature or can you use it right from the fridge
It doesn't really matter for discard recipes 🙂
Yay!!! I finally made a good sourdough bread! Thank you. I didn’t have bread flour so I just used all purpose. It doubled in just about an hour (it’s about 74 degrees in my house). In the oven, it didn’t seem to rise as much as yours in the picture, but it is still delicious and near perfect consistancy!! (Others I’ve made have been too dense) I was getting too impatient and made it about 40 min into cooling before taking a taste.
The link is broke to print the recipe. Pleeeeease fix so I can print and bake. 🙂
Hi Linda - the recipe prints ok for me. It might be the browser you're using x
By far, the ugliest, stickiest, glopiest (New Word) bread dough ever!!!! I was 100% certain it would be a disaster. I am so glad I was wrong. I loved it, too easy and I’ve been trying to get my bread to be a little more airy and this recipe did it for me. Probably the very best part, I was able to use The Pantry Mama recipe for Sourdough Discard Sandwich Loaf and make them almost simultaneously. The loaf was also a WINNER.
Absolutely love this recipe, probably made it 5-10 times now, a perfect "lazy loaf" for when you're not in the full-on sourdough baking mood!
One thing I've wondered about is if you let it rise again after shaping it. The instructions aren't super clear on that: do you give it another rise before throwing it in the oven or are you letting the oven come up to temp while the dough is in its bulk rise, then shaping it and throwing it directly in the oven? I've done it both ways and haven't paid enough attention to know if it's better either way. Also, this is a no-knead recipe, yeah?
Thanks for this!
I had the same question as you…
I made the bread this morning, and it was absolutely delicious! I just started on the second loaf to bake it in the morning and take it over to a friend alongside with a stick of salter butter and some strawberry freezer jam
Thank you for sharing this recipe!
Made this recipe twice already and wow its so so good! Especially considering the minimal effort going into it. Quick question: the top part of my crust turned out perfectly crispy but the bottom crust was verrry hard for me both times. Like can't slice all the way down, almost break your teeth kinda crispy/hard. Is this normal? Or is there something could do to prevent this? (Maybe its an issue with my Dutch oven?) The rest of the bread was beautiful and delicious btw!
Tha k you for this easy recipe. I also used your recipe for chocolate chip muffins and they came out great.
This is a fantastic bread recipe. I have made it several times (I’ve failed at making successful sourdough several times, so I have had a lot of discard over the past year), and this is probably the easiest bread recipe I have ever baked. My family and neighbors all rave about it.
I have baked it in both a cast iron Dutch oven and regular loaf pans. If you are using loaf pans, make sure you put a water bath on the bottom rack of your oven to help create the steam that the inside of a Dutch oven creates.
If you want to add to this recipe, I have found that thinly sliced garlic and 100g of garlic salt (instead of the 100g regular salt) is a popular loaf. My family also loves the “everything bagel” seasoning mixed into the dough. Today I’m trying this recipe with cinnamon and brown sugar.
A very easy, versatile, recipe for utilizing discard and not throwing it away!
Thank you so much for creating and publishing this recipe!
Look no further!!!
This bread recipe is IT. It cannot get any easier.
I’m new to bread making, and have been using my homemade sourdough starter for a few months now. I love allll the ways I can use the discard - but was needing something new (and honestly just wanted more bread out of it!)
This recipe has been my go to for weeks now. I make it in double batches, eat it all… or gift one to a neighbor or friend haha.
After trying a few different discard recipes - this one has been the best tasting and looking. And it’s basically committed to my memory now. Thank you thank you!!
My family of 6 eagerly waited around the table as I pulled this bread out. Everyone heartily approved and first loaf is mostly gone. Good thing I had enough discard for a second loaf!
I love the speed of this bread. My house was a bit warm (and maybe my discard was in good shape.) Only took 45 minutes to rise. This one's a keeper!
Thank you for all the great information. For the discard bread recipe, can I make it in the Zojirushi bread maker?
Excellent recipe, very tasty bread and extremely easy to make. Had a lot of discard from my starter, so I doubled it in the recipe, decreasing the amount of water and flour accordingly. Absolute keeper, thank you!!!
I tried this recipe the other day and the bread came out wonderful! I baked mine 20 minutes with the lid on and 30 minutes without the lid in the dutch oven at 450 degrees F. I am planning on making again tomorrow. Thank you for the recipe!
Thank you so much. Just don’t have the time for traditional sourdough. Mixed in the bread machine on dough. Baked in old cast iron Dutch oven on the grill. Fantastic. Burned the bottom a bit but will adjust the grill and add baking stone under pot next time. Scraped the burn off. Delicious. Making again this weekend. Decreased water just a bit.
So glad to have found this recipe! The discards we really bugging me, and there is only just so much composting I wanted to be doing. I added one set of stretch and folds but that was the only change I made. It’s the first time I’ve gotten a crust to blister up !